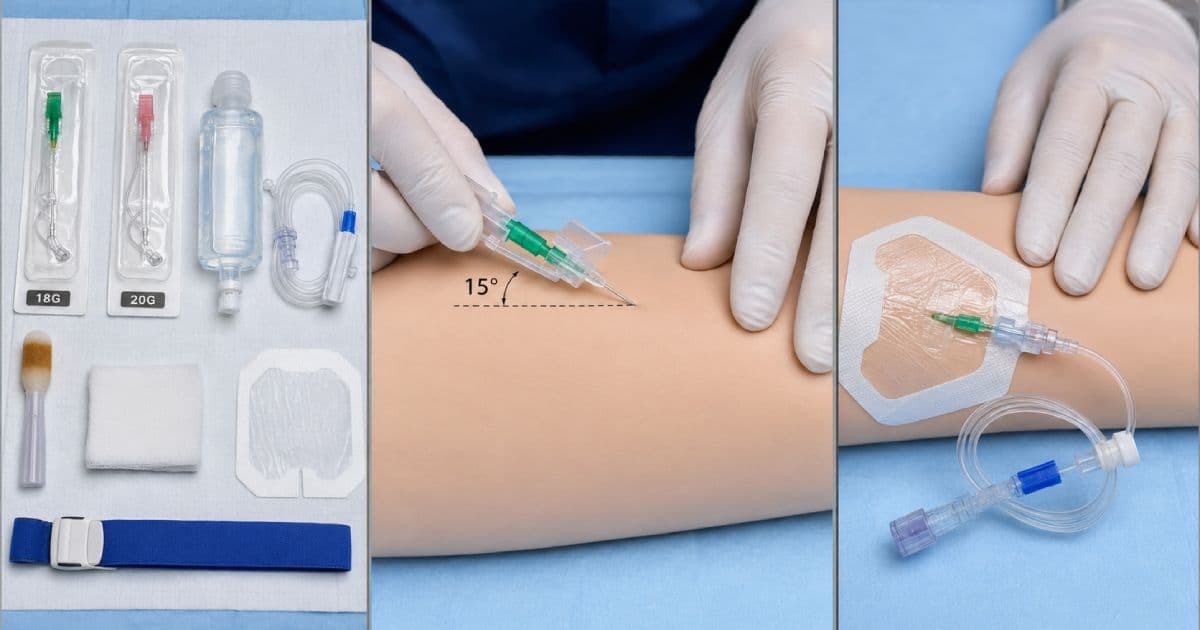
Starting a peripheral intravenous line can feel like a major clinical milestone.
You must choose an appropriate vein, keep the patient comfortable, maintain aseptic technique, control a sharp device, recognize flashback, thread a flexible catheter, connect the tubing, and evaluate the site—all within a few minutes.
That is a lot of coordination for one skill.
Missing an IV does not mean you are bad at nursing. Peripheral IV insertion is a motor skill. Anatomical knowledge matters, but so do positioning, hand control, repetition, and the ability to learn from each attempt.
A safe IV insertion for nursing students begins before the needle touches the skin. Preparation, vein selection, infection prevention, and knowing when to stop are just as important as successfully threading the catheter.
This guide covers:
- Peripheral IV catheter gauge selection
- Supplies and preprocedure safety checks
- How to palpate and select a vein
- A step-by-step IV insertion sequence
- The flashback and slight-advance technique
- Anchoring rolling veins
- Tips for difficult and fragile veins
- Common reasons an IV attempt fails
- Infiltration, extravasation, hematoma, and phlebitis
- Securement, reassessment, and documentation
What Is a Peripheral IV?
A peripheral IV, or PIV, is a short flexible catheter placed into a peripheral vein. After insertion, the metal introducer needle is removed and only the plastic catheter remains in the vessel.
A PIV may be used for:
- Intermittent IV medications
- Continuous fluids
- Blood and blood components
- Emergency medication access
- Selected contrast injections
- Short-duration infusions
The intended therapy affects the catheter's gauge, length, location, and whether a peripheral line is appropriate at all.
Some medications and solutions can injure peripheral tissue if they leak outside the vein. Some therapies require central access because of their concentration, pH, vesicant properties, duration, or prescribed administration method. Verify the order and ask the preceptor, pharmacist, vascular access nurse, or provider when the access plan is unclear.
The Four Goals of a Safe IV Start
A successful IV insertion is not simply “catheter in vein.”
The line should be:
- Clinically appropriate: The site and device can safely support the ordered therapy.
- Aseptic: Key parts and the prepared skin are protected from contamination.
- Patent: The catheter functions without pain, swelling, leaking, or abnormal resistance.
- Stable: The dressing and securement reduce movement while keeping the site visible.
An IV that threads but is painful, infiltrated, contaminated, or poorly secured is not a successful start.
Choosing the Right IV Catheter Gauge
Gauge describes the diameter of the catheter. The relationship is inverse:
- A lower gauge number means a larger catheter diameter.
- A higher gauge number means a smaller catheter diameter.
A large catheter can deliver fluid faster, but it also occupies more of the vein. A catheter that is unnecessarily large may irritate the vessel, reduce blood flow around the device, and increase the risk of complications.
Color coding is commonly standardized, but catheter length, flow rate, pressure rating, and design vary by product. Always read the package and use the device approved by your facility.
IV Catheter Gauge Quick Reference
| Gauge | Common hub color | Common clinical uses | Important considerations |
|---|---|---|---|
| 18 gauge | Green | Trauma, rapid fluid administration, major surgery, and situations requiring higher flow | Requires a vein large enough to accommodate it; do not choose it automatically for every adult |
| 20 gauge | Pink | Routine adult fluids, many medications, perioperative use, and blood when rapid flow is not required | Often called the adult “workhorse,” but it may still be too large for a fragile vein |
| 22 gauge | Blue | Smaller or fragile veins, many routine infusions, older adults, children, and some blood-component administration | Slower flow than a 20 gauge; confirm that it meets the therapy and facility requirements |
| 24 gauge | Yellow | Neonates, pediatrics, and extremely small or fragile veins | Lower flow; catheter and infusion limitations must be checked carefully |
Does CT Contrast Always Require an 18 Gauge?
No.
Contrast requirements depend on:
- The examination
- Required injection flow rate
- Catheter gauge and length
- Catheter pressure rating
- Vein and site
- Radiology protocol
- Manufacturer instructions
The American College of Radiology states that a 20-gauge or larger catheter is preferable for flow rates of 3 mL/second or greater, while some 22-gauge catheters may tolerate higher rates. This does not mean every 22-gauge line is appropriate for every scan.
Confirm the planned study with radiology before inserting a catheter solely for contrast. Never assume that catheter color alone proves power-injection compatibility.
Can Blood Run Through a 22 Gauge?
It may be possible when rapid administration is not required and the patient's vein cannot safely accommodate a larger catheter. The product, patient condition, urgency, blood component, pump or pressure requirements, and facility policy all matter.
Do not sacrifice a fragile vein merely to reach a traditional gauge target. Ask which access is clinically required.
Gather and Prepare Supplies Before the Attempt
Organization protects both the patient and the catheter.
Typical supplies include:
- Provider order or verified indication
- Appropriately sized safety IV catheter
- Tourniquet
- Facility-approved skin antiseptic
- Clean gloves and any additional required PPE
- Primed extension set or needleless connector
- Compatible sterile flush, when indicated
- Sterile transparent semipermeable dressing or approved alternative
- Stabilization or securement device
- Tape and label, if required
- Absorbent pad or gauze
- Sharps container within immediate reach
- Additional supplies required by facility policy
Inspect every package for integrity and expiration. Know how the safety mechanism activates before approaching the patient.
Prime Before You Puncture
When the device and workflow allow, prime the extension set and needleless connector with the facility-approved compatible solution before insertion.
This avoids trying to open, connect, and prime components while controlling a newly placed catheter. It can reduce manipulation, blood exposure, and accidental catheter displacement.
Do not assume that every line is primed with the same solution or volume. The device, ordered therapy, patient factors, medication compatibility, and facility policy determine the correct approach.
Complete the Preprocedure Checks
Before selecting a vein:
- Perform hand hygiene.
- Verify the patient using two approved identifiers.
- Confirm the indication and prescribed therapy.
- Review allergies, including antiseptic, adhesive, and dressing sensitivities.
- Assess both upper extremities when appropriate.
- Explain the procedure and obtain cooperation.
- Position the patient safely, preferably seated or lying with the arm supported.
- Place the sharps container where it can be reached without crossing over the patient.
- Ask whether the patient has a history of difficult IV access or a site that usually works.
If the patient has a history of syncope with needles, position them to reduce fall risk and obtain help as needed.
The Art of Vein Selection: Feel, Do Not Just Look
A visible blue vessel is not automatically the best vein.
The vein may be:
- Very superficial
- Fragile
- Sclerosed from prior treatment
- Too small for the selected catheter
- Located over a joint
- Close to an artery, tendon, or nerve
A suitable vein often feels soft, springy, and resilient under the fingertip. It refills after gentle compression and has a reasonably straight segment long enough to accept the catheter.
Palpate with the pad of one finger rather than repeatedly tapping the skin. Compare several possible sites before committing.
Start Distal When Clinically Appropriate
For many adult PIVs, choose a distal upper-extremity site before moving proximally. A forearm vein is often more comfortable and stable than a hand or antecubital site.
Starting distally helps preserve proximal veins for later access if the first site fails.
This is a preference, not an absolute rule. Emergencies, trauma, planned contrast, vein quality, therapy needs, and ultrasound-guided access may require a different location.
Avoid Areas of Flexion When Possible
An IV in the antecubital fossa or wrist may kink or occlude whenever the patient bends the joint. Movement can:
- Trigger pump alarms
- Disrupt the dressing
- Irritate the vessel wall
- Cause catheter migration
- Shorten dwell time
- Limit mobility
The antecubital fossa may still be appropriate for an emergency, short-term need, blood draw, rapid infusion, or high-flow contrast study. Select it because the clinical situation supports it, not simply because the vein is easy to see.
Sites That Require Avoidance or Extra Assessment
Do not use a limb or site automatically. Assess the reason, urgency, and local policy.
Dialysis Fistula or Graft
Protect an extremity containing an arteriovenous fistula or graft. Do not place a peripheral IV in that limb unless there is explicit specialist direction or a true emergency decision under applicable policy.
Infection, Burn, Injury, or Poor Circulation
Avoid:
- Infected or inflamed skin
- Open wounds
- Burns
- An existing hematoma
- Areas of infiltration or phlebitis
- A limb with severely impaired circulation
- A site distal to significant injury when circulation is uncertain
Weak, Paralyzed, or Sensory-Impaired Limb
A patient may not detect pain from infiltration or nerve injury in an affected limb. Positioning, edema, circulation, contracture, and the ability to protect the catheter also matter.
Use an unaffected extremity when feasible. If alternatives are limited, collaborate with the care team and follow policy rather than treating every neurologically affected limb as an identical absolute prohibition.
Breast Surgery and Lymph Node Removal
The old blanket rule was to “never” use the arm on the side of a mastectomy or axillary lymph node dissection.
Current evidence does not support a universal lifetime ban. The Society for Ambulatory Anesthesia states that ipsilateral IV placement after breast surgery, with or without axillary lymph node dissection, is not automatically contraindicated.
Still assess:
- Current or previous lymphedema
- Axillary surgery and radiation history
- Infection or skin injury
- Available access in the other arm
- Urgency and anticipated duration
- Patient preference
- Facility policy
When practical, many clinicians choose the unaffected arm, especially when lymphedema is present. If that arm is unavailable, do not delay urgent care based on an oversimplified rule. Use clinical judgment and escalate the access decision.
How to Make a Vein Easier to Find
If a vein is not immediately apparent, improve venous filling before making a blind attempt.
Use Gravity
Lower the arm below heart level for a short period while maintaining safe positioning. Gravity can increase venous filling.
Apply Warmth
A warm, not hot, compress for approximately 5 to 10 minutes may promote vasodilation. Protect fragile skin, reassess temperature, and follow facility policy.
Adjust the Tourniquet
Place the tourniquet several inches above the intended site. It should impede venous return without stopping arterial flow.
An excessively tight tourniquet can make a fragile vein rupture, increase patient discomfort, and obscure the pulse. For delicate skin, use a light touch and consider placing the tourniquet over clothing if permitted.
Ask for Gentle Hand Opening and Closing
The patient may slowly open and close the hand. Avoid vigorous pumping, slapping, or pounding the arm.
Use Ultrasound and Escalation Resources
When difficult IV access is predicted, early referral may prevent repeated painful attempts.
Potential clues include:
- Previous need for ultrasound-guided access
- Few or no palpable veins
- Extensive scarring
- Obesity or edema
- Chronic infusion history
- Long-term IV drug use
- Severe dehydration
- Repeated prior attempts
Ultrasound-guided insertion requires training and competency. It is not necessary for every PIV, but it can be valuable for difficult access when performed by a qualified clinician.
Step-by-Step Peripheral IV Insertion
Use the sequence approved by your school and facility. Catheter designs differ, so review the specific device before beginning.
Step 1: Position the Patient and Apply the Tourniquet
Support the arm on a stable surface. Place an absorbent pad under the site if needed.
Apply the tourniquet approximately 4 to 6 inches above the selected vein, adjusting for anatomy and policy. Palpate the vein and confirm that the catheter can travel along a straight segment.
Do not leave the tourniquet in place longer than necessary.
Step 2: Perform Hand Hygiene and Don Gloves
Perform hand hygiene at the required point in the procedure and put on clean gloves.
Gloves reduce blood exposure. They do not replace hand hygiene or aseptic technique.
Protect key parts:
- Do not touch the catheter shaft.
- Do not touch disinfected connector surfaces.
- Do not touch the prepared insertion site.
- Do not allow sterile or disinfected components to contact the bed, clothing, or your gloves.
Step 3: Disinfect the Skin and Let It Dry
Use the facility-approved antiseptic and follow its exact instructions for application and drying.
For one common chlorhexidine-alcohol product used on dry arm skin, the manufacturer directs repeated back-and-forth strokes for 30 seconds followed by approximately 30 seconds of air drying. Other applicators and antiseptics have different instructions.
The universal lesson is:
- Apply the correct antiseptic for the correct contact time.
- Allow it to air dry completely.
- Do not blot, wipe, wave, or fan it dry.
- Do not repalpate the prepared site unless the technique and policy maintain asepsis or you reprepare the skin.
Wet alcohol-based antiseptic can sting, is less effective when not allowed to dry as directed, and remains flammable.
Step 4: Anchor the Vein
Use the thumb of your nondominant hand to pull the skin taut below the insertion site.
This creates gentle longitudinal traction and helps stabilize a vein that rolls. Keep your anchoring hand far enough below the puncture point that it cannot be struck by the needle.
Do not place your finger above the intended insertion site in the needle's path.
For a very mobile vein, slightly adjust the direction of traction until the vein feels stable. Maintain the traction through skin puncture and initial vessel entry.
Step 5: Insert Bevel Up at a Low Angle
Hold the catheter device in your dominant hand using the grip recommended by the manufacturer.
With the bevel facing up, enter the skin at a low angle—often approximately 10 to 30 degrees depending on the vein's depth and the device.
- Use a lower angle for a superficial vein.
- A deeper vein may require a slightly greater entry angle.
- Avoid a steep approach that increases the chance of puncturing the back wall.
Advance smoothly and deliberately. Do not probe from side to side under the skin.
Step 6: Recognize Flashback
Watch the catheter's flash chamber or blood-control feature for blood return.
Flashback means the needle tip has entered the vessel. It does not always mean the plastic catheter tip is fully inside the lumen.
This distinction explains one of the most common student errors.
Step 7: Lower the Angle and Advance Slightly
Once flashback appears:
- Stop the initial forward motion.
- Lower the device until it is nearly parallel with the skin.
- Advance the needle-catheter unit only a very short distance, as taught for that device.
Students often learn this as the “extra 1–2 mm” step. Treat that distance as a teaching cue, not a universal measurement. The needle tip extends beyond the catheter tip, and the exact relationship varies by catheter design and gauge.
The goal is to bring the catheter tip—not only the needle tip—into the vein without advancing through the back wall.
Step 8: Thread the Catheter
Stabilize the needle hub. Advance only the flexible catheter into the vein until the hub approaches the skin.
Do not force the catheter.
Most importantly, never pull the needle partly out and then reinsert or advance it into the plastic catheter. The needle can damage or shear the catheter.
If the catheter meets resistance, stop and troubleshoot safely. Do not use force to overcome a valve, vessel curve, or incorrect position.
Step 9: Release the Tourniquet and Control Blood
Release the tourniquet before flushing.
Depending on the device and facility policy, apply gentle pressure over the vein beyond the catheter tip to reduce blood leakage. Do not press directly on the catheter or insertion site in a way that dislodges the line.
Activate the safety feature and place the needle immediately into the sharps container. Do not recap, bend, break, or leave the sharp on the bed or procedure tray.
If the safety feature does not activate correctly, follow the device and exposure-control procedure. Never manipulate the sharp unnecessarily.
Step 10: Connect the Primed Extension
Keeping key parts protected, connect the primed extension set or needleless connector.
Avoid twisting the catheter or allowing the hub to lift out of the vessel. If blood-control pressure is used, release it after the closed system is connected.
Step 11: Assess Patency With a Gentle Flush
Follow the device and facility procedure for patency assessment.
This may include observing blood return when appropriate and administering a gentle test flush with the approved solution and volume.
Watch and ask for:
- Pain or burning
- Swelling
- Coolness
- Leaking
- Blanching
- Unusual resistance
- A change in skin color
Stop immediately if any of these occur. Never force a flush.
Blood return may support intravascular placement, but its absence does not always prove failure. Likewise, a line that flushes without obvious swelling still requires ongoing clinical assessment.
Flush volume is not universal. It depends on the catheter, extension tubing, patient, medication, therapy, and facility protocol. Common adult practice may use several milliliters of preservative-free 0.9% sodium chloride, but the correct volume is the one specified for the situation.
Step 12: Secure and Dress the Site
Let the site dry if needed and secure the catheter without obscuring the insertion point.
Use the approved sterile transparent semipermeable dressing or other indicated dressing. Apply the stabilization device according to instructions.
Good securement should:
- Keep the catheter from pistoning in and out
- Prevent tension on the hub and tubing
- Allow visualization of the insertion site
- Avoid restricting circulation
- Avoid placing nonsterile tape beneath the sterile dressing unless the product and policy permit it
Create a small loop of extension tubing if required so a tug on the line does not pull directly on the catheter.
Label the dressing according to policy, which may include date, time, gauge, and initials.
Step 13: Reassess the Patient and Dispose of Supplies
Make sure the patient is comfortable and the extremity has normal color, warmth, sensation, and movement.
Dispose of contaminated supplies correctly, remove gloves, and perform hand hygiene.
Explain how the patient can protect the site and which symptoms to report.
A Compact IV Start Sequence
What to Do When You Get Flash but the Catheter Will Not Thread
Stop advancing and keep your hands steady.
Possible causes include:
- Only the needle tip entered the vein
- The catheter tip is against the vessel wall
- The device is approaching a valve
- The vein curves
- The angle remains too steep
- The back wall has been punctured
- The vein has collapsed
If you have flash but cannot thread:
- Do not force the catheter.
- Do not advance the needle after the catheter has moved off it.
- Maintain control of the device.
- Follow the troubleshooting method taught for that catheter and permitted by policy.
- If resistance persists, remove the device, apply pressure, and choose a new site or escalate.
Some experienced clinicians use specialized, device-specific techniques to reposition a catheter. These require training and are not permission to probe, repeatedly move the needle, or force fluid into a questionable site.
“Floating” a resistant catheter with saline is not a universal rescue method. A flush should never be used to push through pain, swelling, abnormal resistance, or uncertain placement.
Pro Tips for Difficult IV Access
Build a Vein-Selection Routine
Use the same sequence:
- Look at both arms.
- Ask about prior access.
- Apply the tourniquet.
- Palpate systematically.
- Use warmth or gravity.
- Decide whether the site matches the therapy.
- Escalate before repeated attempts.
The goal is not to prove that you can place every IV. The goal is to obtain safe access with the least avoidable harm.
Use Palpation to Map the Vein
Before cleaning, follow the vessel with your fingertip.
Identify:
- Direction of travel
- Depth
- Straight length
- Branches
- Valves or firm areas
- Nearby pulse
A palpable arterial pulse is a reason to stop and reassess the anatomy.
Adjust Your Angle for Fragile Veins
Older adults and patients receiving chemotherapy, corticosteroids, or repeated infusions may have thin skin and delicate vessels.
Helpful adjustments may include:
- Selecting a smaller appropriate gauge
- Using the lowest practical insertion angle
- Applying a light tourniquet
- Avoiding excessive skin traction
- Using gentle securement and skin-protective products
- Avoiding a site where the dressing will tear compromised skin
Fragile veins may rupture from excessive pressure even when the needle placement is accurate.
Choose the Right Attempt, Not the Most Visible Vein
A large vein over a moving joint may be easy to enter but difficult to maintain. A slightly smaller straight forearm vein may produce a more durable line.
Consider the whole lifecycle:
- How long will the line be needed?
- What will be infused?
- Will the patient use a walker?
- Is the site on the dominant hand?
- Will the patient bend the joint?
- Can nurses see and reassess the insertion point?
Know When to Escalate
Many organizations limit an individual clinician to two attempts, but this is not a universal rule. Nursing students may have stricter limits.
Follow the school and facility policy. Ask for help earlier when:
- The patient is unstable
- Access is urgently needed
- The patient has known difficult access
- Few safe veins are available
- Ultrasound-guided access is usually required
- The remaining sites must be preserved
- The attempt exceeds your validated competency
Escalation is a patient-safety skill.
Common Mistakes That Cause IV Failure
Mistake 1: Threading at the First Flash
The needle tip may be in the lumen while the catheter tip remains outside it. Pushing the catheter immediately can make it buckle or catch at the vessel wall.
Better approach: Lower the angle and make the brief, controlled advance appropriate for the device before threading.
Mistake 2: Entering at Too Steep an Angle
A steep angle can pass through the front and back walls of a shallow vein.
Better approach: Match the angle to the vein's depth. Most superficial veins require a low approach.
Mistake 3: Releasing Skin Traction Too Soon
A mobile vein may move away from the needle before the vessel is entered.
Better approach: Maintain safe anchoring until initial entry and stabilization are complete.
Mistake 4: Choosing the Catheter Before Assessing the Vein
Automatically reaching for an 18 or 20 gauge can lead to unnecessary trauma.
Better approach: Start with the therapy, then select the smallest suitable gauge for the best available vein.
Mistake 5: Touching the Site After Cleaning
Repalpating the prepared skin with a nonsterile glove contaminates the insertion area.
Better approach: Map the vein before antisepsis. If the site must be touched again, follow the facility's aseptic method or reprep it.
Mistake 6: Not Allowing Antiseptic to Dry
Inserting through wet antiseptic can cause stinging and defeats the product's required drying step.
Better approach: Use the exact application and dry time in the product instructions.
Mistake 7: Probing Under the Skin
Sweeping the needle side to side is painful and can injure nerves, vessels, and tissue.
Better approach: If alignment is lost, stop. Make only a permitted controlled correction or remove the device.
Mistake 8: Forcing the Catheter or Flush
Resistance is information.
Better approach: Stop when the catheter will not advance or the flush is painful or resistant. Reassess instead of applying more pressure.
Mistake 9: Forgetting the Tourniquet
Flushing or securing with the tourniquet still applied can increase pressure and discomfort.
Better approach: Build tourniquet release into a fixed sequence before connection and flush.
Mistake 10: Poor Securement
Even a well-placed catheter can fail if the hub moves or the tubing pulls.
Better approach: Stabilize the catheter, protect the site from tension, and keep the insertion point visible.
How to Recognize a “Blown Vein”
“Blown vein” is an informal term. It may describe a hematoma caused during insertion or an IV that has infiltrated.
Possible findings include:
- Rapid swelling near the puncture site
- Bruising or a dark area under the skin
- Blood leaking into surrounding tissue
- Pain or tenderness
- Loss of expected blood return
- Resistance or pain with flushing
Stop the attempt or infusion. Remove the catheter and apply pressure unless a suspected extravasation protocol directs you to leave the catheter temporarily for aspiration or antidote administration.
Do not keep manipulating a failed site.
Peripheral IV Complications
Knowing the difference between complications helps the nurse respond correctly.
| Complication | Typical findings | Immediate nursing response |
|---|---|---|
| Hematoma | Bruising, swelling, tenderness, or blood leakage after vessel injury | Stop, remove the device, apply pressure, and reassess |
| Infiltration | Nonvesicant fluid enters tissue; swelling, coolness, discomfort, slowed infusion, or leaking may occur | Stop the infusion, remove the catheter unless protocol says otherwise, elevate, and follow the infiltration procedure |
| Extravasation | Vesicant or irritant medication enters tissue; pain, burning, swelling, blistering, color change, or tissue injury may occur | Stop the infusion, leave the catheter in place initially if the agent-specific protocol requires aspiration or antidote, notify the appropriate clinician, and follow the emergency protocol |
| Phlebitis | Redness, warmth, tenderness, swelling, streaking, or a palpable venous cord | Stop and remove the catheter, assess severity, and follow policy |
| Local infection | Increasing redness, warmth, pain, drainage, or systemic signs | Stop use, remove as ordered or required, notify the appropriate clinician, and follow culture/treatment policy |
| Occlusion or mechanical failure | Pump alarms, inability to flush, leaking, or intermittent flow | Stop; check clamps, tubing, position, and site; never force the line |
Never Ignore Pain During Flushing
Pain is not proof of a specific complication, but it is a reason to stop and reassess.
A patient should not be told that burning, pressure, or swelling is “normal” simply because the catheter was recently inserted.
Suspected Nerve Contact
Sharp, electric, shooting pain, numbness, tingling, or weakness during insertion may indicate nerve contact or injury.
Stop advancing and remove the device according to policy. Assess and report persistent symptoms promptly.
Suspected Arterial Puncture
Bright red, pulsatile blood or unexpectedly forceful flow may indicate arterial entry.
Stop the procedure, remove the catheter, apply firm pressure for the time required by patient factors and policy, and escalate. Anticoagulation, coagulopathy, or vascular disease may require prolonged observation and pressure.
Assessing the IV After Insertion
A PIV requires assessment before every use and at the frequency specified by policy.
Inspect and palpate as appropriate for:
- Pain or tenderness
- Redness
- Warmth or coolness
- Swelling
- Leaking
- Dressing integrity
- Catheter movement
- Phlebitis
- Infiltration or extravasation
- Signs of infection
- Continued clinical need
The World Health Organization recommends at least daily inspection and removal when the catheter is no longer clinically indicated or when a complication develops.
Do not keep a line “just in case” when policy and the clinical plan no longer support it.
Patient Education
Tell the patient:
- Keep the dressing clean, dry, and intact.
- Avoid pulling on the tubing.
- Report pain, burning, swelling, wetness, leaking, numbness, or tightness immediately.
- Do not silence pump alarms without notifying staff.
- Ask for help before showering, dressing, or moving equipment if the line may be pulled.
If the IV crosses a joint, explain how movement may affect the infusion while preserving safe mobility.
Documenting a Peripheral IV Insertion
Documentation should allow another clinician to understand what was inserted, where it is, how it functions, and what occurred.
Record according to policy:
- Date and time
- Side and anatomical site
- Catheter gauge and length
- Device type, when required
- Number of attempts and clinicians, when required
- Skin antiseptic or technique, when required
- Patency assessment and flush response
- Presence of blood return, if assessed
- Dressing and securement
- Patient tolerance
- Education provided
- Complications and actions taken
- Escalation to vascular access or another clinician
Avoid vague entries such as “IV good.”
A more useful note is:
20-gauge PIV inserted in left dorsal forearm on first attempt using aseptic no-touch technique. Brisk blood return present; line flushed gently without pain, swelling, leaking, or resistance. Transparent dressing and securement device applied. Patient instructed to report pain, burning, wetness, or swelling.Use only findings you actually assessed and the terminology approved by your electronic health record.
Skills-Lab Practice: How to Improve
Successful practice focuses on technique, not just completion.
Rehearse the Sequence
Practice saying the steps aloud:
“Tourniquet, prep, dry, anchor, bevel up, flash, lower, slight advance, thread, release, safety, connect, assess, secure.”
The sequence reduces missed steps when anxiety rises.
Practice With the Actual Device
Different catheters have:
- Different grip surfaces
- Different flashback behavior
- Blood-control features
- Different safety activation methods
- Integrated extensions or separate connectors
Device familiarity matters. Do not assume every brand works like the skills-lab catheter.
Slow Down the Critical Moment
Students often rush after flashback because they fear losing the vein.
Instead:
- Pause.
- Lower the angle.
- Make the small advance.
- Stabilize.
- Thread smoothly.
The calmest two seconds of the attempt may be the most important.
Ask for Specific Feedback
After an attempt, ask:
- Was my vein selection appropriate?
- Was my angle too high or too low?
- Did I maintain traction?
- Did I lower the device after flash?
- Did my needle hand move while threading?
- Was the catheter appropriate for the therapy?
- Did I maintain aseptic technique?
Specific feedback builds skill faster than simply counting successful starts.
NCLEX-Style Clinical Judgment Connections
Peripheral IV questions often test recognition of complications and safe prioritization.
Recognize Cues
High-priority cues include:
- Pain and swelling during infusion
- Cool, pale skin around the site
- Blistering after a vesicant medication
- Redness, warmth, or a palpable venous cord
- Electric pain during insertion
- Bright red pulsatile blood
- Abnormal resistance during flushing
Analyze Cues
Ask:
- What is infusing?
- Is the medication a vesicant or irritant?
- Did symptoms begin during insertion or later?
- Is the extremity perfused?
- Is tissue injury progressing?
- Does the protocol require the catheter to remain temporarily for aspiration or antidote?
Take Action
The safest response commonly begins with stopping the infusion or procedure.
Then:
- Prevent further exposure
- Assess the site and extremity
- Follow the agent-specific infiltration or extravasation protocol
- Notify the appropriate clinician
- Document findings and actions
- Reestablish access at a different site when needed
Do not automatically remove a catheter before checking the extravasation protocol when a vesicant is involved.
Reinforce complication recognition and priority setting with NurseZee's NCLEX practice questions.
Frequently Asked Questions
What are the basic peripheral IV insertion steps?
Verify the indication and patient, select the smallest appropriate catheter, gather and prime supplies, position the arm, apply the tourniquet, clean and dry the site, anchor the vein, insert bevel up, recognize flashback, lower and advance slightly, thread the catheter, release the tourniquet, activate the safety device, connect, assess with a gentle flush, secure, and document.
What angle should a nursing student use for IV insertion?
A low angle, often approximately 10 to 30 degrees, is commonly taught. The exact angle depends on vein depth, anatomy, and catheter design. A superficial fragile vein may require an angle near the lower end of that range. Lower the device after flashback before the slight advance and threading step.
Why do I need to advance after seeing flashback?
The introducer needle tip extends slightly beyond the plastic catheter tip. Flashback may occur when only the needle tip is in the vein. Lowering the angle and advancing the unit a very short, device-appropriate distance helps bring the catheter tip into the lumen before threading.
What should I do if I get flashback but the catheter will not advance?
Stop and do not force it. The catheter may be against a wall, valve, or curve, or its tip may not be fully inside the vein. Never reinsert the needle into a catheter that has advanced off the needle. Use only the troubleshooting method taught for that device and allowed by policy. Remove the catheter and apply pressure if resistance continues.
How do I anchor a rolling vein?
Place the nondominant thumb safely below the planned puncture site and pull the skin gently downward to create longitudinal traction. Keep that hand out of the needle path and maintain tension through initial vessel entry. Avoid excessive traction on fragile skin.
How can I find hard veins for an IV?
Assess both arms, ask the patient about previous access, lower the arm briefly, apply a warm compress, adjust tourniquet pressure, and palpate systematically. Avoid slapping the skin. If difficult access is predicted or attempts are limited, escalate early to a trained ultrasound or vascular access clinician.
Which IV gauge is best for most adults?
There is no single best gauge for every adult. A 20 gauge is common for routine inpatient therapy, but a 22 gauge may be safer for smaller or fragile veins. Choose the smallest gauge that safely supports the prescribed therapy and device requirements.
Does a CT contrast scan require an 18-gauge IV?
Not always. The required gauge depends on the contrast protocol, flow rate, catheter pressure rating, vein, and site. A 20 gauge or larger is often preferred for higher flow rates, but some approved 22-gauge devices may be used under specific protocols. Confirm requirements with radiology and the manufacturer.
Can blood be administered through a 22-gauge IV?
Sometimes, particularly when rapid flow is not required and the patient's vein cannot accommodate a larger catheter. Follow the blood administration policy, device specifications, patient condition, and urgency. Do not assume that a larger catheter is always safer.
How do I know if I blew a vein?
Sudden swelling, bruising, pain, leaking, loss of blood return, or abnormal resistance can indicate vessel injury, hematoma, or infiltration. Stop the attempt or infusion. Remove the catheter and apply pressure unless an extravasation protocol directs you to leave it temporarily for aspiration or treatment.
What is the difference between infiltration and extravasation?
Infiltration is leakage of a nonvesicant solution into surrounding tissue. Extravasation involves a vesicant or irritant that can cause more serious tissue injury. Both require stopping the infusion, but extravasation management is medication-specific and may require aspiration, an antidote, temperature therapy, and urgent escalation.
How many IV attempts should a nursing student make?
Follow the nursing program and clinical site's policy. Many organizations use a limit of two attempts per clinician, but this is not universal and student limits may be stricter. Escalate sooner for unstable patients, known difficult access, fragile veins, or limited remaining sites.
Should I flush an IV that is painful or resistant?
No. Stop and assess the catheter and site. Never force a flush through pain, swelling, leaking, coolness, blanching, or abnormal resistance. A resistant line may be kinked, occluded, malpositioned, infiltrated, or against the vessel wall.
How often should a peripheral IV be assessed?
Assess the site before every use and at the frequency required by the patient's condition, therapy, age, and facility policy. The World Health Organization recommends at least daily inspection and removal when the catheter is no longer clinically needed or when signs of a complication appear.
Final Clinical Takeaway
Peripheral IV insertion becomes more manageable when you treat it as a reproducible sequence rather than one dramatic needle stick.
Prepare before puncturing. Select the smallest appropriate catheter. Choose a vein by palpation and clinical purpose, not appearance alone. Protect asepsis. Anchor safely. After flashback, lower the angle and make the controlled slight advance before threading. Never reinsert the needle into the catheter, and never force resistance.
Most importantly, know when to stop. Pain, swelling, abnormal resistance, electric sensations, or suspected arterial entry are safety signals—not obstacles to push through.
Technical confidence comes with repetition. Clinical judgment comes from making every attempt appropriate, observable, and safe.
References
- World Health Organization. Guidelines for the Prevention of Bloodstream Infections and Other Infections Associated With the Use of Intravascular Catheters: Part I—Peripheral Catheters. 2024.
- World Health Organization. Summary of Recommendations on Peripheral Catheter Insertion, Maintenance, Access, and Removal. 2024.
- Centers for Disease Control and Prevention. Guidelines for the Prevention of Intravascular Catheter-Related Infections. 2011.
- Occupational Safety and Health Administration. Needlestick and Sharps Injuries in Hospital Patient Care Units. Accessed July 28, 2026.
- American College of Radiology. ACR Manual on Contrast Media. 2026.
- Society for Ambulatory Anesthesia. Statement on Intravenous Catheter Placement, Venipuncture, and Blood Pressure Measurements in the Ipsilateral Upper Extremity After Breast Surgery. 2021.
- National Cancer Institute. Lymphedema: Health Professional Version. Accessed July 28, 2026.
- BD. Vessels of the Upper Extremities and Peripheral IV Catheter Selection. Accessed July 28, 2026.
- BD. ChloraPrep Single and Triple Swabstick Instructions for Use. Accessed July 28, 2026.
Educational disclaimer: This guide supports nursing education and does not replace supervised skills training, competency validation, manufacturer instructions, facility policy, provider orders, pharmacy guidance, or applicable scope-of-practice requirements.